&. |

A software developer’s musings on software development

Password tips for non-geeks

Warning: I wrote this blog in 2011. That is a long time ago, especially on the internet. My opinions may have changed since then. Technological progress may have made this information completely obsolete. Proceed with caution.

I’ve been thinking about passwords recently, as I have gone and changed passwords for pretty much every website that I can remember having a password for. For me, this was prompted by the hacking of PlayStation Network, which led to my PSN password being compromised. And, like most people, I used the same password for PSN that I used for many other sites. This is generally a Bad Thing, but what are you going to do?

Well, for geeks, the answer is “have a separate, randomly-generated password for every site, and the password must be long and contain numbers, lowercase letters, uppercase letters, and symbols.”

I realize that this is impractical for normal people.

So here’s my advice for non-geeks. Come up with a sentence. A really random sentence. Try to include some numbers in the sentence. Then take the first letter of each word. This will be your base password. Here, I’ll make up an example:

forget about the last 7 things u Heard 2-day

That gives us: fal7tuH2d

Believe it or not, it’s really easy to remember a sentence like this. You can leave out articles, conjunctions, and/or prepositions if you like, and you can replace “are” with “r”, “you” with “u”, etc. Whatever is most natural for you to remember. Making at least one of the letters uppercase and including some kind of punctuation is good. Make sure there are at least 7 characters, since a lot of sites use 8 characters as the minimum length of a password.

Next, come up with a rule for how you will include the company name in the password. For example, “use the last letter of each word in the company name, and capitalize the last one”. Using this rule, my password for Amazon, PayPal, and Gmail might be as follows:

Amazon: fal7tuH2dN
PayPal: fal7tuH2dyL
Gmail (Google Mail): fal7tuH2deL

Now, if someone somehow obtains your password to one site, they won’t have your password to every site you use. And hopefully they won’t be able to figure out the rule for the last few characters (this is why using something other than the first character of the site name is a good idea). And no one’s ever going to guess a password like that.

Of course, this isn’t fool-proof. But it is a lot more secure than using the same password for every site, and it’s a lot more secure than using a word that can be found in a dictionary or your pet’s name or your birthday or something like that.

Note: If you really want to do it the geeky way (a long, random password for each site), you can get applications that will generate random passwords and store them securely. This makes it so you only need to memorize one password, and that password lets you access all your other passwords. I like KeePass, and it runs without an installer on PC and (I think) Mac. I keep it in my Dropbox so I can use it from home or work. But I don’t do it for every site; mainly, I just do this for really sensitive sites (like bank and credit card websites). And remember, if someone really wants your password, they can probably crack it in a few hours with just five dollars of equipment.


HTML5 video

Warning: I wrote this blog in 2011. That is a long time ago, especially on the internet. My opinions may have changed since then. Technological progress may have made this information completely obsolete. Proceed with caution.

I’ve supported HTML5 video on this site for something like a year now. I don’t think I have commented yet on just how much of a pain it is. This post isn’t a tutorial; other people have already written very good tutorials on HTML5 video. Don’t get me wrong—HTML5 video is a nice thing to have. The videos on this site can play on Flash-less devices like iPhone, iPad, and Android. For current versions of every desktop browser, the video plays nicely without the overhead of loading a Flash container. (And let’s face it, everyone hates Flash.1.) And the syntax is backward-compatible, allowing older browsers to see a flash video player that newer browser will ignore. All-in-all, it’s pretty nice.

Except for the fact that I’m required to convert my video to 4.1 different formats! To play properly everywhere, the video has to be served in:

  • MP4 - for Safari, iPhone/iPad, and Android
  • OGV - for Firefox, Chrome, and Opera
  • WebM - For IE9
  • FLV - For flash player fallback in older browsers (IE 6/7/8 mainly)
  • JPG - Okay, so this isn’t a video format, and it’s not required. But if you don’t pre-load your videos, you need a jpeg to use as the background letting the user know there is a video there they need to click on. (When I said I need 4.1 formats, this was the point one.)

This is pretty ridiculous. If the img tag didn’t already exist, and it were to be added as a new HTML5 element, the syntax would probably look something like this:

<img>
  <source src="/images/whatever/whatever.jpg" type="image/jpeg" /> <!-- for Chrome/Safari -->
  <source src="/images/whatever/whatever.gif" type="image/gif" /> <!-- for Opera -->
  <source src="/images/whatever/whatever.png" type="image/png" /> <!-- for Firefox -->
  <source src="/images/whatever/whatever.bmp" type="image/x-ms-bmp" /> <!-- for IE -->
</img>

Joining together for better queries

Warning: I wrote this blog in 2011. That is a long time ago, especially on the internet. My opinions may have changed since then. Technological progress may have made this information completely obsolete. Proceed with caution.

Here is a tip for writing better SQL queries—specifically, the FROM/WHERE clause.1 I only work with SQL Server and MySQL, so the syntax may be different in different engines.2 I’m writing this because I often see very smart and experienced developers write some downright ugly SQL. I don’t mean to call anyone out; I just want everyone to know there is a better way of joining.

Rule of thumb: If you have a comma in your FROM clause, you’re doing it wrong.

Let’s take a query I just made up as an example

SELECT AVERAGE(Grades.score)
     , Departments.Name
     , Students.Gender
FROM Students,Grades,Departments,Teachers,Courses,Classrooms,Buildings
WHERE Students.id = Grades.Student_id
  AND Courses.Period = 3
  AND Courses.id = Grades.Course_id
  AND Buildings.Building_id = 11
  AND Classrooms.id = Courses.Classroom_id
  AND Buildings.id = Classrooms.Building_id
  AND Grades.Grade > 0
  AND Teachers.id = Courses.Teacher_id
  AND Departments.id = Teachers.Department_id
GROUP BY Departments.Name, Students.Gender

So what’s so bad about this? First of all, it’s tricky to see what exactly we are trying to do here. The WHERE clause is huge, and it’s full of stuff that isn’t really relevant to what we are trying to return. If you were told that this query was returning the wrong values, you would have to stare at it for quite a while to figure out what’s going on here. You know what tables the data is coming from, but you don’t have any simple way to tell how those tables relate to each other. You have to reverse-engineer that information from the monster WHERE clause.

And here is where developers are most likely to mess up: if you forget just one of those AND predicates in the WHERE clause, you end up with a cartesian product. This means if one table has n rows, and another has m rows, you will get n×m rows. This is pretty much never what you actually want. If the developer is working on a small database, with very little data3, he might not even realize this is happening. He checks in his code, and goes on to the next problem. But then the system goes into production, and the tables get a few hundred rows each, and now the query runs for twenty minutes and then the database server crashes! Ouch.

So, what’s the solution? Like I said, if you see a comma in your FROM clause, you’re doing it wrong. JOIN to the rescue!

SELECT AVERAGE(Grades.score)
     , Departments.Name
     , Students.Gender
FROM Grades
JOIN Students    ON Students.id = Grades.Student_id
JOIN Courses     ON Courses.id = Grades.Course_id
JOIN Teachers    ON Teachers.id = Courses.Teacher_id
JOIN Classrooms  ON Classrooms.id = Courses.Classroom_id
JOIN Departments ON Departments.id = Teachers.Department_id
JOIN Buildings   ON Buildings.id = Classrooms.Building_id
WHERE Buildings.Building_id = 11
  AND Courses.Period = 3
  AND Grades.Grade > 0
GROUP BY Departments.Name, Students.Gender

In this version of the query, we JOIN each of the tables together in the FROM clause. This has several advantages, but the biggest by far is that it forces the developer to specify how the tables are joined together. This makes it extremely difficult to accidentally create a cartesian product. It also cleans up the WHERE clause, stripping it down to conditions you are actually filtering on. In this case, we are just looking at third-period courses in some particular building where students are at least attending the class. Whenever I make a change to an existing query that doesn’t use joins, I usually rewrite with joins. I’ve done this for dozens of queries, and the WHERE clause is reduced to a single statement probably 80-90 percent of the time. This makes the query much easier for the next developer to understand at a glance, especially since the join conditions aren’t likely to change over time. As far as performance goes, there is a slight benefit because you’ve already told the database how the tables are joined together. But the database was already figuring this out on its own, so there’s not much of a difference. But it certainly doesn’t perform any worse.

Update 2011-04-18: I forgot to mention one other benefit of this approach. There is a type of error that comes up every once in a while looks something like this: “This query doesn’t return online courses because Courses.Classroom_id is 0/NULL for online courses.” This is easy to solve with joins. Just change the “JOIN Classrooms” clause to “LEFT JOIN Classrooms”. I’ve seen some ugly code that tries to accomplish the same thing with UNION. Union is worse for performance than left join, and left join is specifically designed for this purpose.


  1. I already know what ORM is. Some of us are working on code that doesn’t use ORM and we can’t do anything about it. 

  2. As I recall, this works in DB2, but I haven’t used it in 2 years. It works in Access if you replace JOIN with the more explicit INNER JOIN. And I’m pretty sure Oracle supports it. 

  3. Bad development practice, but don’t pretend like you’ve never done it. 


Side projects

Warning: I wrote this blog in 2011. That is a long time ago, especially on the internet. My opinions may have changed since then. Technological progress may have made this information completely obsolete. Proceed with caution.

Here’s an update on a few side projects I have going. First, you may remember QuickReplace. As I used it myself, I realized that there were some limitations, which I set out to address. So now we have QuickReplace 2.0. One thing I found myself doing with QuickReplace was opening it in several tabs, pasting text in the first tab, copying the output and pasting it in the next tab, because each tab could only run one filter at a time. But now, instead of having a fixed number of filters, which are executed in a fixed order, you can add as many filters as you want. The filters can be dragged and dropped in whatever order you want. And, if you want to save a filter and run it later, there is now a permalink option to do so. As before, the tool was written for me by me, with the assumption that the user (me) knows what they want to do. If you’re a programmer and you understand regular expressions, you should be able to figure it out. I’ve been using the new version for about a month and I think I’ve ironed out all the bugs, but if you find one let me know and I’ll take a look. Unless your “bug” is that it doesn’t work in a browser other than Firefox or Chrome. In which case the bug is that you’re using the wrong browser. (That being said, it seems to work just fine in IE, Safari, and Opera, but I haven’t tested extensively.) Also, the HTML file is self-contained, so you can save it locally if you’d like. (But you can’t run it offline because of a dependency on Google-hosted jQuery.)

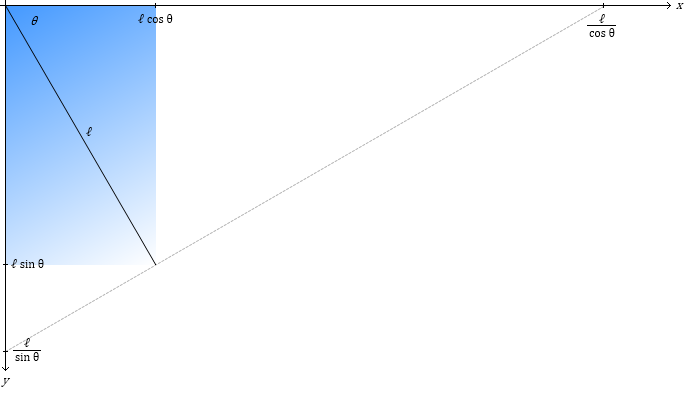
The other side project I’ve made some updates to is my gradient generator. The previous version would generate horizontal or vertical gradients. But then I started thinking, wouldn’t it be better if it generated diagonal gradients too? So I worked out the math and made it happen. Now, instead of an “orientation” parameter that takes either “h” or “v”, we have an “angle” parameter, which takes a number in degrees (from 0 to 360, inclusive). It still takes “h” or “v”, for backwards compatibility—”h” is converted to 0, and “v” is converted to 90.

I added an extra parameter, “extend”. If it is false, the image is only as large as it needs to be to hold the gradient. This is OK if the image is being used as the background of a fixed-size element, but otherwise you won’t see the whole gradient. This is where the extend parameter comes in. If it’s set to true, you will see the whole gradient.

So here’s what it looks like without the extend parameter:

You might also notice that the y axis is inverted. That’s just how images are oriented, and I didn’t correct for it since I figure the most common case is a gradient oriented in the top-left corner. Now, if the gradient is extended, it will look like this:

You can view the gradient generator source code here.

Of course in a few years, when CSS 3 gradients are fully supported, my gradient generator will be obsolete. Oh well.


ImageSizer update

Warning: I wrote this blog in 2011. That is a long time ago, especially on the internet. My opinions may have changed since then. Technological progress may have made this information completely obsolete. Proceed with caution.

If anyone is using ImageSizer, my unimaginatively-named multi-monitor image resizing and cropping tool, I’ve made some minor-but-long-overdue updates. Namely, it can operate on a list of input files, instead of just one. And the list of input files can be anywhere in the parameter list. So you can do something convenient like this:

java -jar ImageSizer.jar -monitorWidth 1024 -height 768 *.jpg

Get it here!

The source is also included in the jar file, if you are interested. And if you don’t know what ImageSizer is, I wrote a pretty extensive description with the initial release, which should answer all your questions.


How to programmatically update your Twitter status using OAuth in PHP

Warning: I wrote this blog in 2010. That is a long time ago, especially on the internet. My opinions may have changed since then. Technological progress may have made this information completely obsolete. Proceed with caution.

Earlier this week I was informed that Twitter will soon be ending its support for “BasicAuth” in the Twitter API, in favor of OAuth authentication. This affects me because I use the API to automatically post a “just blogged!” link to Twitter after every new blog post. Using BasicAuth, this was super simple:

function postStatus($status, $username, $password)
{
  $ch = curl_init();
  curl_setopt($ch, CURLOPT_URL, 'http://www.twitter.com/statuses/update.xml');
  curl_setopt($ch, CURLOPT_CONNECTTIMEOUT, 2);
  curl_setopt($ch, CURLOPT_POST, 1);
  curl_setopt($ch, CURLOPT_POSTFIELDS, 'status=' . urlencode($status));
  curl_setopt($ch, CURLOPT_USERPWD, $username . ':' . $password);

  return curl_exec($ch);
}

OAuth is a little more complicated, but I got it to work after about four or five hours of banging away it with the help of this article.1 Since I couldn’t find anywhere that this was described in detail, I decided I would document the whole process here on my blog. I don’t claim that this code is great, but it gets the job done. If you couldn’t care less about the workings of OAuth, and just want a give-me-teh-codez solution, then this is for you.

The first thing you have to do is register a new app. This sounds scary but it’s actually very easy. When filling out the form, note the following fields:

  • Application Name: this is what will show up under your tweets. In my case, I chose “vacantnebula.com” since all tweets from my app are announcements of new posts on this site.
  • Application Website: this is the URL that application name will link to.
  • Application Type: I’m not sure if it matters, but I chose “client”.
  • Default Access Type: you must select “read & write” to be able to update status (i.e. “write”).

After registering your application, you can view application details. Here you will see your consumer key and your consumer secret. You will need these keys later.

For a single-user application (which is what I’m describing), you will need to click on my access token. This will give you the access token (oauth_token) and access token secret (oauth_token_secret). Again, you will need these later.

And without further ado, here is the code:

<?php

class twitter
{
  //FILL IN THESE VALUES!!
  private $consumerKey      = '???';
  private $consumerSecret   = '???';
  private $oauthToken       = '???';
  private $oauthTokenSecret = '???';

  /**
   * Posts status to a twitter account. Returns true if successful, result
   * of curl_getinfo() if failure. 
   */ 
  function postStatus($status)
  {
    return $this->apiCall('https://api.twitter.com/1/statuses/update.xml'
                         , array('status'=>$status));
  }

  //separate function to leave the door open to other API calls...
  private function apiCall($url, $params)
  {
    $method = 'POST';

    //postString covers what will *actually* be posted
    $postString = $this->joinParams($params);

    //now adding to $params other OAuth properties...
    $params['oauth_nonce']            = sha1(time() . mt_rand());
    $params['oauth_timestamp']        = time();
    $params['oauth_signature_method'] = 'HMAC-SHA1';
    $params['oauth_version']          = '1.0';
    $params['oauth_consumer_key']     = $this->consumerKey;
    $params['oauth_token']            = $this->oauthToken;

    ksort($params); //IMPORTANT!
    $paramString = $this->joinParams($params);

    $signatureBaseString = $method
                         . '&' . rawurlencode($url)
                         . '&' . rawurlencode($paramString);
    $signatureKey = $this->consumerSecret . '&' . $this->oauthTokenSecret;
    $params['oauth_signature'] =
            base64_encode(hash_hmac('sha1', $signatureBaseString, $signatureKey, true));

    $authHeader = 'Authorization: OAuth realm=""';
    foreach($params as $key => $val)
      $authHeader .= ", $key=\"" . rawurlencode($val) . "\"";


    $ch = curl_init();
    curl_setopt($ch, CURLOPT_URL, $url);
    curl_setopt($ch, CURLOPT_CONNECTTIMEOUT, 2);
    curl_setopt($ch, CURLOPT_RETURNTRANSFER, 1);
    curl_setopt($ch, CURLOPT_POST, 1);
    curl_setopt($ch, CURLOPT_POSTFIELDS, $postString);
    curl_setopt($ch, CURLOPT_SSL_VERIFYPEER, false); //required for HTTPS URL
    curl_setopt($ch, CURLOPT_HTTPHEADER, array($authHeader));

    $content = curl_exec($ch);
    $resultInfo = curl_getinfo($ch);
    curl_close($ch);

    if ($resultInfo['http_code'] == 200)
      return true;

    $resultInfo['content'] = $content;
    return $resultInfo;
  }

  //Join key/value pairs together in url string format, encoding values.
  private function joinParams($params)
  {
    $paramString = '';
    foreach($params as $key => $val)
    {
      if($paramString !== '')
        $paramString .= '&';
      $paramString .= $key . '=' . rawurlencode($val);
    }
    return $paramString;
  }
}

And I assume you know this, but to use the API it’d look like this:

$twitter = new twitter();
$result = $twitter->postStatus('hello world!');
  1. I could have saved myself over an hour by realizing that I had to call rawurlencode rather than urlencode; the former encodes spaces as %20, whereas the latter encodes them as +. 


QuickReplace

Warning: I wrote this blog in 2010. That is a long time ago, especially on the internet. My opinions may have changed since then. Technological progress may have made this information completely obsolete. Proceed with caution.

It’s amazing how often, as a programmer, I find myself pasting something into Notepad, then pressing Down, Home, Ctrl+V, over and over and over. (Or a variant, like Down/End/Ctrl+V, or End/Comma/Delete, or F3/Ctrl+V/Enter, etc.) It gets very tedious, and sometimes requires me to write an adhoc Perl script to do it. Yesterday I had the idea to finally just take a few hours to write a simple tool that I should have written years ago.

I give you: QuickReplace

It’s really simple. Just paste text into the first big text area, and then it will be filtered and displayed in the lower text area. There are three types of filters: text that is prepended or appended to each line; a simple search/replace (with and allowed), and a full-on regex substitution. And everything is updated as you type it, so you can see the effects of the filters as you enter them. (This really helps when you haven’t written a regex in a month or so.)

Everything is done in Javascript so the page is completely self-contained—you can view source and save a local copy if you wish. (It does require an internet connection, as it uses Google-hosted jQuery.) It’s also kind of a work in progress that might at any time be edited on the fly. Consider yourself warned.


New and improved gradient generator. *Now almost as good as Photoshop!*

Warning: I wrote this blog in 2010. That is a long time ago, especially on the internet. My opinions may have changed since then. Technological progress may have made this information completely obsolete. Proceed with caution.

You may recall that the gradients I use on this site (in the background images on the photos pages, and in the header above each comment) are dynamically generated. I made some significant improvements to the code over the holiday weekend, which I will discuss here.

First, the minor things. I’ve added support for If-Modified-Since header, so that no cached image is retrieve and no content is returned to the browser if the user has the image cached. In doing this I learned that PHP’s filectime does not actually return the time the file was created; rather, it returns the last time it was changed. I don’t really understand the difference between this and filemtime (time the file was modified), as they both seem to always return the same time. Oh well.

Next, I added support for 3-character colors (like 000 for black and f00 for red). This just makes sense if you’re used to dealing with them in CSS.

And finally, the big improvement is an implementation of error diffusion.1 Why did I need to do this? In some very gradual gradients, you would see bands of individual colors. Eight bits per channel just isn’t quite enough. For example, look at this gradient from 0x888888 to 0x444444:

Gradient from 0x888888 to 0x444444, with no dithering

You should be able to see vertical bands somewhere in that gradient. If not, it probably has to do with your monitor’s gamma settings or something. In any case, what I do to prevent this is keep a running sum of how far off each pixel is from its “true” color. When the absolute value of that sum is greater than 1, I adjust the color of the next pixel by one level in the appropriate direction to compensate. This gives a much smoother gradient:

Gradient from 0x888888 to 0x444444, with no dithering

This actually gives better results than Paint.NET and Paint Shop Pro. Here’s a close-up look at what that looks like, with pixel colors exaggerated:

Close-up of gradient with dithering

It’s good, though it’s not quite as good as what you get in Photoshop:

Close-up of gradient generated in Photoshop

Clearly the Photoshop guys are doing some kind of subpixel shading, since there are slightly colored pixels in a monochrome gradient. I guess they know what they’re doing.

Lastly, here is my PHP gradient generator source code, if you want to look under the covers and/or utilize the code.


  1. Technically, it’s what I thought error diffusion was. But I read the Wikipedia article on error diffusion when writing this post, and now I’m pretty sure that what I did isn’t actually error diffusion. It’s kind of a similar process that I came up with all on my own. 


Please if you make web pages or web apps you really need to know this please

Warning: I wrote this blog in 2010. That is a long time ago, especially on the internet. My opinions may have changed since then. Technological progress may have made this information completely obsolete. Proceed with caution.

Please if you make web pages or web apps you really need to know this please

It is so easy
to make forms much friendlier
with the label tag

A haiku by Kip Robinson


Album Thumbnail PHP class

Warning: I wrote this blog in 2010. That is a long time ago, especially on the internet. My opinions may have changed since then. Technological progress may have made this information completely obsolete. Proceed with caution.

You may have noticed that the thumbnails for albums on our photos page are each little collages. Here are some examples:

Well as of today I’ve received three requests for the code behind these images, so I figured it was time to write up a proper blog post about the it. I mentioned the code in 2006, and that it was inspired by this article from A List Apart. I took their idea and came up with several more layouts to use, and some code to generate the thumbnail from dynamic layouts.

The class takes four image files as input, and generates a thumbnail for them. It does have the annoyance that the generated images have varying heights. I’ve thought about writing a fancy “2.0” version of the code, using Javascript to position/crop/scale the images, then use PHP to render the final result. But who knows if I’ll ever get around to it.

For now, I’ll just show you how it’s used. It’s very easy:

$at = new album_thumbnail();
$at->add_image('/images/001.jpg');
$at->add_image('/images/002.jpg');
$at->add_image('/images/003.jpg');
$at->add_image('/images/004.jpg');

$at->make_thumbnail('/images/thumb1234.jpg');

On my admin page, I initially pick four images at random from a given directory. I can then try again with four more images, or specify to keep some of the images and pick random images for the others, or I can specify the ids of all the images I want to be used. That part is left as an exercise for the reader. Without further ado...

View the source code here.